Create a Subreport in Crystal Reports with Link

posted under by Prav

In the previous section Subreport in Crystal Report is described how to insert a subreport in Crystal Reports . In that case the subreport is embedded within the main Crystal Reports. Here we are creating a subreport , and the subreport has only a link in the main Report , on-demand subreports . That is when the user click the link , then only the subreport display.

vb.net_crystal_report_subreport_ondemand_0.GIF

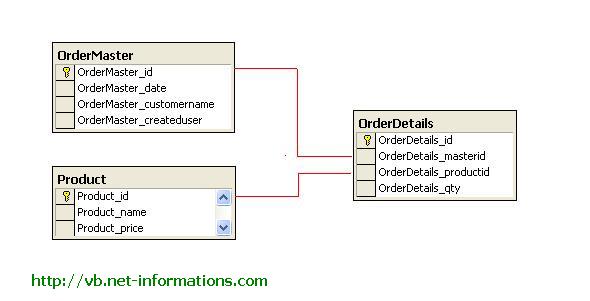
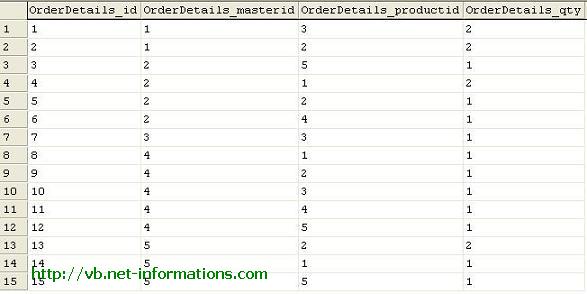
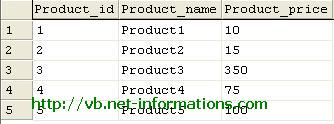
Here we are using our previous example Subreport in Crystal Report and make a link in the min Crystal Reports for on-demand subreport.

Select the subreport object in the Crystal Reports and right click , then select Format Object .

vb.net_crystal_report_subreport_ondemand_1.GIF

Then you will get Format Editor . Select Subreport tab from Format Editor , you can find there a check box On-demand Subreport . You have to select that check box , then the subreport become as a link in your main Crystal Reports. If you want to change the title , you can change it in subreport name textbox. Finally click OK button.

vb.net_crystal_report_subreport_ondemand_2.GIF

Now the designing part is over and you are ready to generate subreport on-demand. Next step is to select the default form(Form1.vb) and add a Button and Crystal Report Viewer to the Form.

Put the following vb.net source code in your form and run the program .


Imports CrystalDecisions.CrystalReports.Engine Imports CrystalDecisions.Shared Public Class Form1     Private Sub Button1_Click(ByVal sender As System.Object, _     ByVal e As System.EventArgs) Handles Button1.Click         Dim crp As New CrystalReport1         CrystalReportViewer1.ReportSource = crp         CrystalReportViewer1.Refresh()     End Sub End Class

VB.NET Crystal Reports Summary Fields

posted under by Prav

All Crystal Reports programming samples in this tutorials is based on the following database (crystaldb) . Please take a look at the database structure before you start this tutorial - Click here to see Database Structure .

In this tutorial we are taking the sum of field value of Total . This is the continuation of the previous tutorial Crystal Report Formula Field . So before we start this tutorial , take a look at the previous tutorial Crystal Report Formula Field.

Here we are taking the grand total of the Total field . The Total field is a Formula field is the result of qty X price .

In the Crystal Reports designer view right click on the Report Footer , just below the Total field and select Insert -> Summary .

vb.net_crystal_report_summary_field_1.GIF

Then you will get a screen , select the Total from the combo box and Sum from next Combo Box , and summary location Grand Total (Report Footer) . Click Ok button

vb.net_crystal_report_summary_field_2.GIF

Now you can see @Total is just below the Total field in the report Footer.

vb.net_crystal_report_summary_field_3.GIF

Now the designing part is over . Select the default form (Form1.vb) you created in VB.NET and drag a button and CrystalReportViewer control to your form.

Select Form's source code view and import the following :

Imports CrystalDecisions.CrystalReports.Engine

Put the following source code in the button click event


Imports CrystalDecisions.CrystalReports.Engine Imports CrystalDecisions.Shared Public Class Form1     Private Sub Button1_Click(ByVal sender As System.Object, _     ByVal e As System.EventArgs) Handles Button1.Click         Dim cryRpt As New ReportDocument         cryRpt.Load("PUT CRYSTAL REPORT PATH HERE\CrystalReport1.rpt")         CrystalReportViewer1.ReportSource = cryRpt         CrystalReportViewer1.Refresh()     End Sub End Class


NOTES:

cryRpt.Load("PUT CRYSTAL REPORT PATH HERE\CrystalReport1.rpt")

The Crystal Report is in your project location, there you can seeCrystalReport1.rpt . So give the full path name of report here.

When you run this program you will get the following screen.

vb.net_crystal_report_summary_field_4.GIF

VB.NET Crystal Reports Formula Fields

posted under by Prav

All Crystal Reports programming samples in this tutorials is based on the following database (crystaldb) . Please take a look at the database structure before you start this tutorial - Click here to see Database Structure .

In this tutorial we are adding a Formula Field in existing Crystal Reports .

SITUATIONS :

If you have a Crystal Reports with Qty and Price , you need an additional field in your Crystal Reports for the Total of QTY X PRICE . In this situation you have to use the Formula Field in Crystal Reports.

In this tutorial we are showing the all orders with qty and price and the total of each row , that means each in each row we are showing the total of qty and price. Before starting this tutorial.

Create a new Crystal Reports with fields CustomerName , Order Date , Product Name and Product Price . If you do not know how to create this report , just look the previous tutorial Crystal Report from multiple tables . In that report selecting only four fields , here we need one more field Prodcut->Price .

After you create the Crystal Reports you screen is look like the following picture :

vb.net_crystal_report_formula_field_1.GIF

Next is to create the a Formula Field for showing the total of Qty and Price .

Right Click Formula Field in the Field Explorer and click New. Then you will get an Input Message Box , type Total in textbox and click Use Editor

vb.net_crystal_report_formula_field_2.GIF

Now you can see Formula Editor screen . Now you can enter which formula you want . Here we want the result of Qty X Price . For that we select OrderDetails.Qty , the multiplication operator and Product.Price . Double click each field for selection.

vb.net_crystal_report_formula_field_3.GIF

Now you can see Total Under the Formula Field . Drag the field in to theCrystal Reports where ever you want .

vb.net_crystal_report_formula_field_4.GIF

Now the designing part is over . Select the default form (Form1.vb) you created in VB.NET and drag a button and CrystalReportViewer control to your form.

Select Form's source code view and import the following :

Imports CrystalDecisions.CrystalReports.Engine

Put the following source code in the button click event


Imports CrystalDecisions.CrystalReports.Engine Imports CrystalDecisions.Shared Public Class Form1     Private Sub Button1_Click(ByVal sender As System.Object, _     ByVal e As System.EventArgs) Handles Button1.Click         Dim cryRpt As New ReportDocument         cryRpt.Load("PUT CRYSTAL REPORT PATH HERE\CrystalReport1.rpt")         CrystalReportViewer1.ReportSource = cryRpt         CrystalReportViewer1.Refresh()     End Sub End Class


NOTES:

cryRpt.Load("PUT CRYSTAL REPORT PATH HERE\CrystalReport1.rpt")

The Crystal Report is in your project location, there you can seeCrystalReport1.rpt . So give the full path name of report here.

When you run this program you will get the following screen.

vb.net_crystal_report_formula_field_5.GIF

VB.NET Crystal Reports for Beginners

posted under by Prav

Start your first VB.NET Crystal Reports .

All Crystal Reports programming samples in this tutorials is based on the following database (crystaldb) . Please take a look at the database structure before you start this tutorial - Click here to see Database Structure .

Open Visual Studio .NET and select a new Visual Basic .NET Project.

simple_vb.net_crystal_report_1.GIF

Create a new Crystal Reports for Product table from the above database crystalDB. The Product Table has three fields (Product_id,Product_name,Product_price) and we are showing the whole table data in the Crystal Reports.

From main menu in Visual Studio select PROJECT-->Add New Item . Then Add New Item dialogue will appear and select Crystal Reports from the dialogue box.

simple_vb.net_crystal_report_2.GIF

Select Report type from Crystal Reports gallery.

simple_vb.net_crystal_report_3.GIF

Accept the default settings and click OK.

Next step is to select the appropriate connection to your database. Here we are going to select OLEDB connection for SQL Server

Select OLE DB (ADO) from Create New Connection .

simple_vb.net_crystal_report_4.GIF

Select Microsoft OLE DB Provider for SQL Server .

simple_vb.net_crystal_report_5.GIF

Next screen is the SQL Server authentication screen . Select your Sql Server name, enter userid , password and select your Database Name . Click next , Then the screen shows OLE DB Property values , leave it as it is , and click finish.

Then you will get your Server name under OLEDB Connection from there select database name (Crystaldb) and click the tables , then you can see all your tables from your database.

From the tables list select Product table to the right side list .

simple_vb.net_crystal_report_6.GIF

Click Next Button

Select all fields from Product table to the right side list .

simple_vb.net_crystal_report_7.GIF

Click Finish Button. Then you can see the Crystal Reports designer window . You can arrange the design according your requirements. Your screen look like the following picture.

simple_vb.net_crystal_report_8.GIF

Now the designing part is over and the next step is to call the created Crystal Reports in VB.NET through Crystal Reports Viewer control .

Select the default form (Form1.vb) you created in VB.NET and drag a button andCrystalReportViewer control to your form.

simple_vb.net_crystal_report_9.GIF

Select Form's source code view and put the code on top

Imports CrystalDecisions.CrystalReports.Engine

Put the following source code in the button click event


Imports CrystalDecisions.CrystalReports.Engine Public Class Form1     Private Sub Button1_Click(ByVal sender As System.Object,   ByVal e As System.EventArgs) Handles Button1.Click         Dim cryRpt As New ReportDocument         cryRpt.Load("PUT CRYSTAL REPORT PATH HERE\CrystalReport1.rpt")         CrystalReportViewer1.ReportSource = cryRpt         CrystalReportViewer1.Refresh()     End Sub End Class

NOTES:

cryRpt.Load("PUT CRYSTAL REPORT PATH HERE\CrystalReport1.rpt")

The Crystal Reports is in your project location, there you can seeCrystalReport1.rpt . So give the full path name of report here.

After you run the source code you will get the report like this.

simple_vb.net_crystal_report_10.GIF


Hope this tutorial help you to create your first Crystal Reports.

Sample Database for running Crystal Reports tutorials

posted under by Prav

In the following section you can see , how to create a sample Database and Tables and data for running Crystal Reports Tutorials . All examples in the VB.NETCrystal Reports Tutorials are based on the following database . First we have to create a database . Give the database name as "crystaldb"

Create a DataBase "crystaldb"

In the crystaldb database , create three tables

OrderMaster , OrderDetails , Product .

OrderMaster

OrderMaster_id

OrderMaster_date

OrderMaster_customer

OrderMaster_createduser

OrderDetails

OrderDetails_id

OrderDetails_masterid

OrderDetails_productid

OrderDetails_qty

Product

Product_id

Product_name

Product_price

The following picture shows the relations of each table :

crytal_report_table_relations.JPG

SQL command for creation tables are follows :

CREATE TABLE [dbo].[OrderMaster] (

[OrderMaster_id] [int] NOT NULL ,

[OrderMaster_date] [datetime] NULL ,

[OrderMaster_customername] [varchar] (50),

[OrderMaster_createduser] [varchar] (50)

) ON [PRIMARY]

CREATE TABLE [dbo].[OrderDetails] (

[OrderDetails_id] [int] NOT NULL ,

[OrderDetails_masterid] [int] NULL ,

[OrderDetails_productid] [int] NULL ,

[OrderDetails_qty] [int] NULL

) ON [PRIMARY]

CREATE TABLE [dbo].[Product] (

[Product_id] [int] NOT NULL ,

[Product_name] [varchar] (50) ,

[Product_price] [numeric](18, 0) NULL

) ON [PRIMARY]

Enter data to the tables :

Order Master Table Data

crytal_report_ordermaster_data.JPG

Order Details Table Data

crytal_report_orderdetails_data.JPG

Product Table Data

crytal_report_product_data.JPG

How to deploy Crystal Reports on Clinet Machine

posted under by Prav

Crystal Reports for Visual Studio ships with your deployment projects that enable you to deploy Crystal Reports components and assemblies on the target machine. We can use different approaches to install Crystal Reports runtime files on the target machine .

If you are using Visual Studio then during your setup and deployment you can add the CRRedist2005_x86.msi file to your setup file and distribute it as a single setup file . The installer can execute the setup file automatically with your .Net Project in a single click. You can find theCRRedist2005_x86.msi file in your system's C:\Program Files\Microsoft Visual Studio8\SDK\v2.0\BootStrapper\Packages\CrystalReports . Also you can distribute the CRRedist2005_x86.msi separately and install it on the target machine.

The other way to install Crystal Reports on target machine is to create a setup file using Merge Modules and distribute it with your application or as a separate setup file. Click the following link to see how to make a setup file with Merge Modules.

Crystal Reports installer using Merge Modules.

Crystal Reports from XML File

posted under by Prav

In this section you can see , creating a Crystal Reports from XML file instead of database . This is very similer to creating Crystal Reports from database , the only difference is to sslect the data source as your XML file.

Here we are creating an XML file name is Product is XML file the same structure of the Product table in the sample Database Structure.

Download Product.XML

vb.net_crystal_report_xml_1.GIF

The basics of Crystal Reports creation provided in previous tutorials , if you dont have much knowledge in Crystal Reports , take a look at the tutorial step by step Crystal Report before start this section.

The change happen only from previous report , when you select Data for Crsyatl Report , you have to select Create New Connection - Database Filesand select the XML file you want to generate Crystal Reports (In this case you select the Product.xml ).

vb.net_crystal_report_xml_2.GIF

Select all the fields from Product and click finish button

Now the designer part is over . Next step is to select the default form(Form1.vb) and add a Button and Crystal Reports Viewer to the Form.

Put the following vb.net source code in your form and run the program .


Imports CrystalDecisions.CrystalReports.Engine Public Class Form1     Private Sub Button1_Click(ByVal sender As System.Object, _   ByVal e As System.EventArgs) Handles Button1.Click         Dim cryRpt As New ReportDocument         cryRpt.Load("PUT CRYSTAL REPORT PATH HERE\CrystalReport1.rpt")         CrystalReportViewer1.ReportSource = cryRpt         CrystalReportViewer1.Refresh()     End Sub End Class

cryRpt.Load("PUT CRYSTAL REPORT PATH HERE\CrystalReport1.rpt")

The Crystal Report is in your project location, there you can seeCrystalReport1.rpt . So give the full path name of report here.

Crystal Reports from SQL Query String

posted under by Prav

In usual practice , Crystal Reports we are getting from pre defined columns. But we can make Crystal Reports from Dynamic column . Here we are going to do the dynamic Crystal Reports from SQL statements . That is we enter SQL in textbox and get the Crystal Reports according to the SQL statement.

vb.net_crystal_report_dynamic_column_0.GIF

All Crystal Reports programming samples in this tutorials is based on the following database (crystaldb) . Please take a look at the database structure before you start this tutorial - Click here to see Database Structure .

Create a new VB.NET project and add a Strongly Typed Dataset . Before creating a Strongly Typed take a look at the detailed tutorial of create a strongly typed datset and add five column in the Datatable. Here we are limiting as five column , but you can add any number of column according to your requirements.

vb.net_crystal_report_dynamic_column_1.GIF

Next step is to create a Crystal Reports design from the Strongly Typed dataset.

vb.net_crystal_report_dynamic_column_2.GIF

Select all the column from dataset.

vb.net_crystal_report_dynamic_column_3.GIF

Select the default form(Form1.vb) and add a TextBox , Button and Crystal Reports Viewer .

Here we are going to pass the SQl statements to Crystal Reports at runtime . For that we parsing the SQL statement before we passing it to Crystal Reports. So we create a function for parsing SQL statements.

Public Function procesSQL() As String

Put the following vb.net source code in your form and run the program .


Imports System.Data.SqlClient Imports CrystalDecisions.CrystalReports.Engine Imports CrystalDecisions.Shared Imports System.Data Public Class Form1     Dim objRpt As New CrystalReport1     Private Sub Button1_Click(ByVal sender As System.Object,   ByVal e As System.EventArgs) Handles Button1.Click         Dim cnn As SqlConnection         Dim connectionString As String         Dim sql As String          connectionString = "data source=SERVERNAME; _   initial catalog=crystaldb;user id=sa;password=PASSWORD;"         cnn = New SqlConnection(connectionString)         cnn.Open()         sql = procesSQL()         Dim dscmd As New SqlDataAdapter(sql, cnn)         Dim ds As New DataSet1         dscmd.Fill(ds, "Product")         objRpt.SetDataSource(ds.Tables(1))         CrystalReportViewer1.ReportSource = objRpt         CrystalReportViewer1.Refresh()     End Sub     Public Function procesSQL() As String         Dim sql As String         Dim inSql As String         Dim firstPart As String         Dim lastPart As String         Dim selectStart As Integer         Dim fromStart As Integer         Dim fields As String()         Dim i As Integer         Dim MyText As TextObject          inSql = TextBox1.Text         inSql = inSql.ToUpper          selectStart = inSql.IndexOf("SELECT")         fromStart = inSql.IndexOf("FROM")         selectStart = selectStart + 6         firstPart = inSql.Substring(selectStart, (fromStart - selectStart))         lastPart = inSql.Substring(fromStart, inSql.Length - fromStart)          fields = firstPart.Split(",")         firstPart = ""         For i = 0 To fields.Length - 1             If i > 0 Then                 firstPart = firstPart  &  " , "  _     & fields(i).ToString() & "  AS COLUMN" & i + 1                 MyText = CType(objRpt.ReportDefinition.ReportObjects("Text"  _     & i + 1), TextObject)                 MyText.Text = fields(i).ToString()             Else                 firstPart = firstPart & fields(i).ToString() & _     "  AS COLUMN" & i + 1                 MyText = CType(objRpt.ReportDefinition.ReportObjects("Text" & _      i + 1), TextObject)                 MyText.Text = fields(i).ToString()             End If         Next         sql = "SELECT " & firstPart & " " & lastPart         Return sql     End Function  End Class

NOTE :

You have to provide the necessary databse information to Connection String.

Crystal Reports Without Database

posted under by Prav

Usually Crystal Reports we are using to fetch data from database and show it as a report. Here we are going to generate a Crystal Reports without using a datbase . For generating a Crystal Reports without database , here we are using a Strongly Typed Dataset and a Data Table.

The basics of Crystal Reports creation you can find in the previous section of this tutorial , before we start this tutorial you can take a look at the step by step Crystal Report.

Generating a Strongly Typed DataSet

Create a new VB.NET Project and accept the default settings. Create a new Dataset from Project - Add New Item Dialogue Box.

vb.net_crystal_report_without_database_1.GIF

Accept the default name DataSet1.xsd .

Create a data table for DataSet1.xsd .

Select DataSet1.xsd from Solution Explorer and right click . Select datatable from the menu. Then you will get a datatable in the Datast . Right click the datatable and select Add-Column .

vb.net_crystal_report_without_database_2.GIF

Here we are making a two column Crystal Reports , so we need two column in the data table . Add and ID column and Name column in the Data Table.

vb.net_crystal_report_without_database_3.GIF

Now the dataset part is over . Next step is to create a Crystal Reports from this Dataset . Before going to make Crystal Reports design please take a look at step by step Crystal Report for easy creation of Crystal Reports.

Select a new Crystal Reports from Add New Item menu and accept the default settings. The next screen is to select appropriate data source . There you can find the Datatable1 from Project data - ADO.NET Datasets , and select Datatable1 to the right side.

vb.net_crystal_report_without_database_4.GIF

Click Next button and select ID and Name from the datatable1 to right side and click finish.

vb.net_crystal_report_without_database_5.GIF

Now the Crystal Reports designer part is over . Next part is to create data for the Crystal Reports . For that we have to create a Data Table through programmatically and add data to dataset1.

Select the default form (Form1.vb) you created in VB.NET and drag one button and CrystalReportViewer control to your form.

Put the following source code in the button click events

Imports CrystalDecisions.CrystalReports.Engine Imports CrystalDecisions.Shared Imports System.Data Public Class Form1     Private Sub Button1_Click(ByVal sender As System.Object, _             ByVal e As System.EventArgs) Handles Button1.Click         Dim ds As New DataSet1         Dim t As DataTable = ds.Tables.Add("Items")         t.Columns.Add("id", Type.GetType("System.Int32"))         t.Columns.Add("Item", Type.GetType("System.String"))          Dim r As DataRow         Dim i As Integer         For i = 0 To 9             r = t.NewRow()             r("id") = i             r("Item") = "Item" & i             t.Rows.Add(r)         Next          Dim objRpt As New CrystalReport1         objRpt.SetDataSource(ds.Tables(1))         CrystalReportViewer1.ReportSource = objRpt         CrystalReportViewer1.Refresh()     End Sub End Class


VB.NET Crystal Reports Load Dynamically

posted under by Prav

We can create Crystal Reports in VB.NET using SQL Query String . Here we create a Strongly Typed dataset for Crystal Reports design and create a connection object and execute the SQL Query String .

All Crystal Report programming samples in this tutorials is based on the following database (crystaldb) . Please take a look at the database structure before you start this tutorial - Click here to see Database Structure .

The basics of Crystal Reports creation you can find in the previous section of this tutorial , before we start this tutorial you can take a look at the step by step Crystal Report.

Generating a Strongly Typed DataSet

In the previous section you can see a detailed tutorial about to create a strongly typed datset and its Crystal Reports design . After create the dataset and Crystal Reports design you should create a connection object and fetch the data from database.

Select the default form (Form1.vb) you created in VB.NET and drag one button and CrystalReportViewer control to your form.

Put the following source code in the button click events


Imports System.Data.SqlClient Imports CrystalDecisions.CrystalReports.Engine Imports CrystalDecisions.Shared Imports System.Data Public Class Form1     Private Sub Button1_Click(ByVal sender As System.Object, _         ByVal e As System.EventArgs) Handles Button1.Click    Dim ds As New DataSet1         Dim cnn As SqlConnection         Dim connectionString As String         Dim sql As String           connectionString = "data source=servername; _  initial catalog=crystaldb;user id=username;password=password;"         cnn = New SqlConnection(connectionString)         cnn.Open()  sql = "SELECT Product_id,Product_name,Product_price FROM Product"         Dim dscmd As New SqlDataAdapter(sql, cnn)         Dim ds As New DataSet1         dscmd.Fill(ds, "Product")         MsgBox(ds.Tables(1).Rows.Count)         cnn.Close()          Dim objRpt As New CrystalReport1         objRpt.SetDataSource(ds.Tables(1))         CrystalReportViewer1.ReportSource = objRpt         CrystalReportViewer1.Refresh()     End Sub End Class 

NOTE :

You have to provide the necessary databse information to Connection String.

VB.NET Crystal Reports from multiple tables

posted under by Prav

All Crystal Reports programming samples in this tutorials is based on the following database (crystaldb) . Please take a look at the database structure before you start this tutorial - Click here to see Database Structure .

Here we are going to do is to generate Crystal Reports from multiple tables. Here we have three table (ordermaster , orderdetails amd product ) and we are generating report from these three tables by connecting each tables with their related fields.

Open Visual Studio .NET and select a new Visual Basic .NET Project.

simple_vb.net_crystal_report_1.GIF

From main menu in Visual Studio select PROJECT-->Add New Item . Then Add New Item dialogue will appear and select Crystal Reports from the dialogue box.

simple_vb.net_crystal_report_2.GIF

Select Report type from Crystal Reports gallery.

simple_vb.net_crystal_report_3.GIF

Accept the default settings and click OK.

Next step is to select the appropriate connection to your database. Here we are going to select OLEDB connection for SQL Server

Select OLE DB (ADO) from Create New Connection .

simple_vb.net_crystal_report_4.GIF

Select Microsoft OLE DB Provider for SQL Server .

simple_vb.net_crystal_report_5.GIF

Next screen is the SQL Server authentication screen . Select your Sql Server name, enter userid , password and select your Database Name . Click next , Then the screen shows OLE DB Property values , leave it as it is , and click finish.

Then you will get your Server name under OLEDB Connection from there selectdatabase name (Crystaldb) and click the tables , then you can see all your tables from your database.

Select all table from the table list to right side list box, because we are creating report from three tables ( OrderMaster, OrderDetails, Product) .

vb.net_crystal_report_from_multiple_table_6.GIF

The next step is to make relation between these selected tables. Here we are connecting the related fields from each table. For that we arrange the tables in visible area in the list (this is not necessary ) and select the field we are going to make relation and drag to the related field of the other table. After made the relation the screen is look like the following picture .

vb.net_crystal_report_from_multiple_table_7.GIF

Next step is to select the fields from the tables . Here we are selecting only Customername , orderdate from ordermastertable , Productname from product table and quantity from order details.

vb.net_crystal_report_from_multiple_table_8.GIF

Click the Finish button because now we are not using other functionalities of this wizard. After that you will get the Crystal Reports designer window . You can arrange the fields in the designer window according to your requirement to view the report . For rearranging you can drag the field object in the screen . For editing right click the field object and select Edit Text Object. The following picture shows the sample of designer window after rearrange the field.

vb.net_crystal_report_from_multiple_table_9.GIF

Now the designing part is over and the next step is to call the created Crystal Reports in VB.NET through Crystal Reports Viewer control .

Select the default form (Form1.vb) you created in VB.NET and drag a button andCrystalReportViewer control to your form.

simple_vb.net_crystal_report_9.GIF

Select Form's source code view and put the code on top

Imports CrystalDecisions.CrystalReports.Engine

Put the following source code in the button click event


Imports CrystalDecisions.CrystalReports.Engine Public Class Form1     Private Sub Button1_Click(ByVal sender As System.Object,   ByVal e As System.EventArgs) Handles Button1.Click         Dim cryRpt As New ReportDocument         cryRpt.Load("PUT CRYSTAL REPORT PATH HERE\CrystalReport1.rpt")         CrystalReportViewer1.ReportSource = cryRpt         CrystalReportViewer1.Refresh()     End Sub End Clas
NOTES:

cryRpt.Load("PUT CRYSTAL REPORT PATH HERE\CrystalReport1.rpt")

The Crystal Report is in your project location, there you can seeCrystalReport1.rpt . So give the full path name of report here.

After you run the source code you will get the report like this.

vb.net_crystal_report_from_multiple_table_10.GIF


Here we connected three tables related field and get the result . If you have any comments please contact the email address in our contact page.

Create Crystal report in VB.Net

posted under by Prav

Create report by vb.net and crystal report

1. Create new visual basic project.

2. Add button and CrystalReportViewer to form1.


3. Add new DataSet item.

4. Add DataTable in dataset design page and add data table columns.
- Title, FirstName, LastName, Address


5. Add Crystal Report item by select report document as a blank report


6. On Field Explorer right click at Database Fields and select Database Expert.

7. Select Project Data -> ADO.NET DataSets and add customer table to ReportDataset.


8. Design Report (Add report header name txtHeader and report footer name txtFooter).


9. Sample code to show report.

Private Sub btnShow_Click(ByVal sender As System.Object, ByVal e As System.EventArgs) Handles btnShow.Click
' Get data to dataset
Dim CustomerData As DataSet = CreateDataSet()

' Create report instance and set data to report data source
Dim rpt As New CustomerReport
rpt.SetDataSource(CustomerData.Tables(0))

' Access crystal report object
' Sample to access textbox object

Dim txtHeader As CrystalDecisions.CrystalReports.Engine.TextObject = rpt.Section2.ReportObjects("txtHeader")
txtHeader.Text = "This is Report Header"

Dim txtFooter As CrystalDecisions.CrystalReports.Engine.TextObject = rpt.Section2.ReportObjects("txtFooter")
txtFooter.Text = "This is Report Footer"

' Show Report
Me.CrystalReportViewer1.ReportSource = rpt

End Sub

Private Function CreateDataSet() As DataSet
Dim ds As New DataSet("ReportDataset")

' Create Table
Dim dt As New DataTable("Customer")
dt.Columns.Add("Title", Type.GetType("System.String"))
dt.Columns.Add("FirstName", Type.GetType("System.String"))
dt.Columns.Add("LastName", Type.GetType("System.String"))
dt.Columns.Add("Address", Type.GetType("System.String"))

' Add DataTable to DataSet
ds.Tables.Add(dt)

' Create new row
Dim dr As DataRow = ds.Tables(0).NewRow
dr("Title") = "Mr"
dr("FirstName") = "Tom"
dr("LastName") = "Brown"
dr("Address") = "Tom Address"
ds.Tables(0).Rows.Add(dr)

dr = ds.Tables(0).NewRow
dr("Title") = "Mr"
dr("FirstName") = "John"
dr("LastName") = "Grary"
dr("Address") = "John Address"
ds.Tables(0).Rows.Add(dr)

dr = ds.Tables(0).NewRow
dr("Title") = "Mr"
dr("FirstName") = "Alex"
dr("LastName") = "Smith"
dr("Address") = "Alex Address"
ds.Tables(0).Rows.Add(dr)

Return ds
End Function


10. Show Report.


top